In Java, there are several types of service. There are arithmetic operators, customer service, service logic, and service conditions. Operator follows the various priorities that so compilernya akan know which service to run in the first some cases the service is shared in a statement.
Operator arithmetic
The following are the basic arithmetic operators that can be used to create a
Java programs:
+ : op1 + op2 Adding op2 with Op1
* : op1 * op2 op1 to op2 multiplying
/ : op1 / op2 Sharing op1 with op2
% : op1 % op2 Calculating the rest of the division of op1 with op2
- : op1 - op2 reduce op2 from op1
Here is an example program in the use of this operator-operator:
public class aritmatikaDemo
{
public static void main(String[] args)
{
//little number
int i = 37;
int j = 42;
double x = 27.475;
double y = 7.22;
System.out.println("Variable values...");
System.out.println(" i = " + i);
System.out.println(" j = " + j);
System.out.println(" x = " + x);
System.out.println(" y = " + y); //Answer number
System.out.println("Adding...");
System.out.println(" i + j = " + (i + j));
System.out.println(" x + y = " + (x + y));
//reduction in the number
System.out.println("Subtracting...");
System.out.println(" i - j = " + (i - j));
System.out.println(" x - y = " + (x - y));
//digit multiplication
System.out.println("Multiplying...");
System.out.println(" i * j = " + (i * j));
System.out.println(" x * y = " + (x * y));
//division number
System.out.println("Dividing...");
System.out.println(" i / j = " + (i / j));
System.out.println(" x / y = " + (x / y));
//calculate the modulus results from the division of
System.out.println("Computing the remainder...");
System.out.println(" i % j = " + (i % j));
System.out.println(" x % y = " + (x % y));
//type of merger
System.out.println("Mixing tipes...");
System.out.println(" j + y = " + (j + y));
System.out.println(" i * x = " + (i * x));
}
}
Below is the output of the program,
Variable values...
i = 37
j = 42
x = 27.475
y = 7.22
i + j = 79
Adding...
x + y = 34.695
Subtracting...
i - j = -5
x - y = 20.255
Multiplying...
i * j = 1554
x * y = 198.37
Dividing...
i / j = 0
x / y = 3.8054
Computing the remainder...
i % j = 37
x % y = 5.815
Mixing tipes...
j + y = 49.22
i * x = 1016.58
Operator Increment and Decrement
From the basic arithmetic operators, also consists of the Java unary increment operator (+ +)
and unary decrement operator (--). increment and decrement operators increase and reduce the value stored in the form of a variable number of value 1. For example, the statement,
count = count + 1; //count value increment with a value of 1
with the same statement,
count++;
OP++ :Adding value in the op 1; evaluate the value of op before diincrementasi / added
++OP :Adding value in the op 1; evaluate the value of op before diincrementasi / added
OP-- :Reduce the value 1 on the op; evaluate the value of op before diincrementasi / added
--OP :Reduce the value 1 on the op; evaluate the value of op before diincrementasi / added
Increment and decrement operators can be placed before or after the operand.
When used before the operand, will result in a variable or diincrement didecrement with a value of 1, and then a new value is used in the statement where he added. For example,
int i = 10,
int j = 3;
int k = 0;
k = ++j + i; //yield k = 4+10 = 14
When the increment and decrement operators are placed after the operand, the value of the variable old will be used first operated prior to the statement which he added. For example,
int i = 10,
int j = 3;
int k = 0;
k = j++ + i; //yield k = 3+10 = 13
Relations Operator
Relations operator to compare two values and determine the relationship between values it. Of the output is a boolean value that is true or false.
" > Op1> op2 op1 is greater than op2"
" > = Op1> = op2 op1 is greater than or equal to op2"
" < Op1 <= Op1 <= op2 op1 is less than or equal to op2 "
" == Op1 == op2 op1 together with op2 "
" ! = Op1! = Op2 op1 is not equal to op2 "
Here is an example program that uses the service relations,
public class RelasiDemo { public static void main(String[] args)
{ //some value int i = 37; int j = 42; int k = 42;
System.out.println("Variable values...");
System.out.println(" i = " + i);
System.out.println(" j = " + j);
System.out.println(" k = " + k); //greater than System.out.println("Greater than..."); System.out.println(" i > j = " + (i > j)); //false
System.out.println(" j > i = " + (j > i)); //true
System.out.println(" k > j = " + (k > j)); //false
//greater or equal to
System.out.println("Greater or equal to...");
System.out.println(" i >= j = " + (i >= j)); //false
System.out.println(" j >= i = " + (j >= i)); //true
System.out.println(" k >= j = " + (k >= j)); //true
//less than
System.out.println("Less than...");
System.out.println(" i < j =" ">
System.out.println(" j < i =" ">
System.out.println(" k < j =" ">
//Less than or equal to
System.out.println("Less than or equal to...");
System.out.println(" i <= j = " + (i <= j)); //true
System.out.println(" j <= i = " + (j <= i)); //false
System.out.println(" k <= j = " + (k <= j)); //true //with the same
System.out.println("with the same...");
System.out.println(" i == j = " + (i == j)); //false
System.out.println(" k == j = " + (k == j)); //true //not the same as
System.out.println("Not the same as...");
System.out.println(" i != j = " + (i != j)); //true
System.out.println(" k != j = " + (k != j)); //false
}
}
Here is the result of the output from this program:
Variable values...
i = 37
j = 42
k = 42
Greater than...
i > j = false
j > i = true
k > j = false
Greater or equal to...
i >= j = false
j >= i = true
k >= j = true
Less than...
i < j =" true">
j < i =" false">
k < j =" false">
Less than or equal to...
i <= j = true
j <= i = false
k <= j = true with the same...
i == j = false
k == j = true
Not the same as...
i != j = true
k != j = false
Tuesday, August 4, 2009
Sunday, August 2, 2009
Variable
Variables are data items that are used to store the object statement. Variable has a data type and name. Type indicates the data type of value that can be formed by the variable itself. Variable name must follow the rules of the identifier.
Variable declaration and initialisation
For the variable declaration is as follows,
[= initial value];
Note: The value is between <> is a required value, while values in
marked [] are optional.
Here is an example program and declare that the several
variables,
public class VariableSamples { public static void main (String [] args) { / / data type declarations with the variable name / / Result and data type boolean boolean result; / / data type declarations with the variable name / / Option data type and char char option; option = 'C'; / / mark 'C' as an option / / data type declarations with the variable name / / grade, double data type and has been in the initialisation / / to 0.0 double grade = 0.0; } }
Displaying Variable Data
To remove the value of a variable that you want, we can use the command as follows,
System.out.println() System.out.print()
Here is an example program,
public class OutputVariable { public static void main( String[] args ){ int value = 10; char x; x = ‘A’; System.out.println( value ); System.out.println( “The value of x=” + x ); } }
The program will remove the following text on the screen,
10 The value of x=A
System.out.println() vs. System.out.print()
What distinguishes between the System.out.println () and System.out.print ()?
The first to add a new line at the end of the data for the excluded, while
not next.
Note the statement,
System.out.print("Hello "); System.out.print("world!");
The statement will produce the following output on the screen,
Hello world!
Now see the following statement,
System.out.println("Hello "); System.out.printin("world!");
The statement will produce the following output on the screen,
Hello
world!
Reference Variables and Primitive Variables
Now we will distinguish two types of variables that are owned by the Java program. There reference variables and primitive variables.
Primitive variables are variables with primitive data types. They store data in the actual memory location where the variable is located.
Reference variables are variables that store addresses in a memory location. The point to a memory location where data is actually located. When you declare
variables in a particular class, you actually declare a variable in the reference classnya in the form of the object is.
For example, if we have two variables with data types int and String.
int num = 10; String name = "Hello"
eg the illustration shown below is the memory of the computer
You, where you have the address of each memory cell, the variable name and data
form as follows.
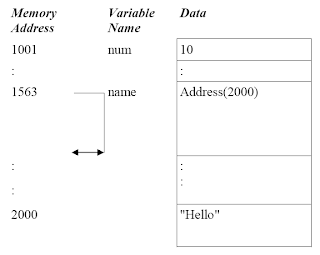 As you can see, the primitive variable for num, data in the location where the variables are. To reference a variable name, variable only refers to the address where the data is really there.
Variable declaration and initialisation
For the variable declaration is as follows,
Note: The value is between <> is a required value, while values in
marked [] are optional.
Here is an example program and declare that the several
variables,
public class VariableSamples { public static void main (String [] args) { / / data type declarations with the variable name / / Result and data type boolean boolean result; / / data type declarations with the variable name / / Option data type and char char option; option = 'C'; / / mark 'C' as an option / / data type declarations with the variable name / / grade, double data type and has been in the initialisation / / to 0.0 double grade = 0.0; } }
Displaying Variable Data
To remove the value of a variable that you want, we can use the command as follows,
System.out.println() System.out.print()
Here is an example program,
public class OutputVariable { public static void main( String[] args ){ int value = 10; char x; x = ‘A’; System.out.println( value ); System.out.println( “The value of x=” + x ); } }
The program will remove the following text on the screen,
10 The value of x=A
System.out.println() vs. System.out.print()
What distinguishes between the System.out.println () and System.out.print ()?
The first to add a new line at the end of the data for the excluded, while
not next.
Note the statement,
System.out.print("Hello "); System.out.print("world!");
The statement will produce the following output on the screen,
Hello world!
Now see the following statement,
System.out.println("Hello "); System.out.printin("world!");
The statement will produce the following output on the screen,
Hello
world!
Reference Variables and Primitive Variables
Now we will distinguish two types of variables that are owned by the Java program. There reference variables and primitive variables.
Primitive variables are variables with primitive data types. They store data in the actual memory location where the variable is located.
Reference variables are variables that store addresses in a memory location. The point to a memory location where data is actually located. When you declare
variables in a particular class, you actually declare a variable in the reference classnya in the form of the object is.
For example, if we have two variables with data types int and String.
int num = 10; String name = "Hello"
eg the illustration shown below is the memory of the computer
You, where you have the address of each memory cell, the variable name and data
form as follows.
 As you can see, the primitive variable for num, data in the location where the variables are. To reference a variable name, variable only refers to the address where the data is really there.
Monday, June 22, 2009
Java Literals
Literals are signs that the changes do not occur or constant. Different literals in Java is: Integer Literals, Floating-Point Literals, Boolean Literals, Character Literals and String Literals.
Integer Literals
Integer literals be distinguished in several different formats: decimal (base 10), hexadecimal (base 16), and octal (base 8). In the use of data type integer on the program, we must follow the rules of some special notation.
For decimal numbers, we do not need a special notation. We only write the number as a decimal is. for hexadecimal digits, it must be marked by "0x" or "0x". for octal, marked by "0". For example, a number representing 12. Writing in the form of desimalnya is 12, Meanwhile, in hexadecimal, it becomes 0xC, and in octal, with the same value 014.
Default data type for integer literals is int. Int is a signed 32-bit value. In the cases you can expect to force integer literal to be long data types by adding the characters "l" or "L". data types are marked by long displaying data in 64-bit. We will discuss the types of data on
next opportunity.
Floating-Point Literals
Floating point literals represent decimal form with a separate section. As example is 3.1415. Floating point literals can be expressed in standard notation or scientific. For example, 583.45 stated in the standard notation, while 5.8345e2 expressed in scientific notation.
Default Floating point literals have the type of data that is expressed in the double 64-bit. To use the accuracy of smaller (32-bit) float, only to add character "f" or "F".
Boolean Literals
Boolean literals have only two values, true or false.
Character Literals
Character Literals represented by a single Unicode character. Unicode characters are 16-bit character set that replaces the 8-bit ASCII character set. Unicode allows use of symbols and special characters from other languages.
To use character literals, the characters in the single pute marks ( '') (single quote delimiters). For example a letter, represented as' a '.
To use special characters such as a new line character, backslash is used followed by the character code. For example, '\ n' character to a new line or replace the line, '\ r' to represent the value back (carriage return), '\ b' Backspace to.
String Literals
String literals represent multiple characters and expressed in double pute marks ( "") ( double quotes). For example the string literal is, "Hello World".
Monday, June 15, 2009
Analyzing First Java program
Now, we will try to analyze the first Java program:
public class Hello
{
/ **
* My first java program
* /
public static void main (String [] args) {
/ / display the string "Hello world" on the screen
System.out.println ( "Hello world!");
}
}
The first line of code:
public class Hello
indicates the name of the Hello class. In Java, all code should be placed in declaration in the class. we do so by using the keyword class. As In addition, use the class access specifier public, which indicates that the class we have free access to the other class from another package that also (packagemerupakan collection of class-class). We will discuss more in the package and access specifier in the next session.
The next line which is made up of brackets brace (denotes the beginning of blocks. In the code this, we put the brace brackets on the next line after the class declaration, however, we can also put this brace brackets after the first line of code that we write. Thus, we can write our code as follows:
public class Hello
{
or
public class Hello {
Next three lines indicate the existence of a Java comment. Comment is used to document each section of code that is written. Comments not is part of the program itself, but used for the purpose of documentation. Comments can be added itself to the code you write as a guide can help the learning process is good programming.
/**
* My first java program
*/
Comments expressed with a "/ *" and "*/". Anything that is a sign of is ignored by the Java compiler, and they only considered as a comment.
Next line,
public static void main (String [] args) {
or can be also written as follows,
public static void main (String [] args)
{
the name of a method in the Hello class that acts as a method main. Main method is the starting point of a Java program. All programs except applet written in Java language starting with the main method. Be sure to follow the principle of the correct sign.
The line is also a further comment,
/ / Displays the string "Hello world" on the screen
Now we learn how to make 2 comments. The first way is to put in the comment / * and * /, and the other way is to write sign / / at the beginning of the comment
Next line,
System.out.println("Hello world!");
displays the text "Hello World!" on the screen. Command System.out.println (), display in side the text by double-pute marks ( "") on the screen. Last two lines that consist of two brace brackets used to cover method primary and each class respectively.
Writing Style Comments C
Comments or C-style comments also referred to some lines begin with / * and ends with * /. All text that is between two marks are considered as comment. No comments such as C + + style, this comment can reach a few lines. As example,
/* this is an example of a
C style or multiline comments */
Special javadoc comment
Comments javadoc used for special men-generate HTML documentation for the your Java program. You can create a javadoc comment with the start line with / ** and mengakhirinya with * /. Comments such as C_style, can also reach a few lines. Comments can also consist of tags for add more information on your comment. For example,
/**
This is an example of special java doc comments used for \n
generating an html documentation. It uses tags like:
@author Florence Balagtas
@version 1.2
*/
The statement in the Java and Blocks
The statement is one or more lines of code that end with a semicolon. As for example is a single statement
System.out.println(“Hello world”);
public static void main( String[] args ){
System.out.println("Hello");
System.out.println("world");
}
Java Identifier
Java Identifier is a sign that represents the names of variables, method, class, etc.. Example of Identifier is: Hello, play, System, out. Pendeklarasian Java is case-sensitive. This means that Identifier: Hello is not the same as the hello. Identifier must begin with a letter, underscore "_", or dollar sign "$". Letters can be uppercase or lowercase. Characters
can further use the number 0 smpai 9. Identifier can not use the keyword in Java, such as class, public, void, etc.. Next we will discuss more about the keyword in Java.
Keyword in Java
Keyword is the identifier that has to be defined previously by Java for a particular purpose. You can not use keywords as variable names, class, your method, etc.. The following is a list of keywords in Java (Java Keywords).

We will discuss all about the meaning of each keyword and how they are used in the process of writing Java programs.
Note: true, false, null, and not including the keyword akan but they include special words, so you can not use them as variable names in your program.
public class Hello
{
/ **
* My first java program
* /
public static void main (String [] args) {
/ / display the string "Hello world" on the screen
System.out.println ( "Hello world!");
}
}
The first line of code:
public class Hello
indicates the name of the Hello class. In Java, all code should be placed in declaration in the class. we do so by using the keyword class. As In addition, use the class access specifier public, which indicates that the class we have free access to the other class from another package that also (packagemerupakan collection of class-class). We will discuss more in the package and access specifier in the next session.
The next line which is made up of brackets brace (denotes the beginning of blocks. In the code this, we put the brace brackets on the next line after the class declaration, however, we can also put this brace brackets after the first line of code that we write. Thus, we can write our code as follows:
public class Hello
{
or
public class Hello {
Next three lines indicate the existence of a Java comment. Comment is used to document each section of code that is written. Comments not is part of the program itself, but used for the purpose of documentation. Comments can be added itself to the code you write as a guide can help the learning process is good programming.
/**
* My first java program
*/
Comments expressed with a "/ *" and "*/". Anything that is a sign of is ignored by the Java compiler, and they only considered as a comment.
Next line,
public static void main (String [] args) {
or can be also written as follows,
public static void main (String [] args)
{
the name of a method in the Hello class that acts as a method main. Main method is the starting point of a Java program. All programs except applet written in Java language starting with the main method. Be sure to follow the principle of the correct sign.
The line is also a further comment,
/ / Displays the string "Hello world" on the screen
Now we learn how to make 2 comments. The first way is to put in the comment / * and * /, and the other way is to write sign / / at the beginning of the comment
Next line,
System.out.println("Hello world!");
displays the text "Hello World!" on the screen. Command System.out.println (), display in side the text by double-pute marks ( "") on the screen. Last two lines that consist of two brace brackets used to cover method primary and each class respectively.
Comments on Java
Comments are notes written in code with the goal as documentation. The text is not part of the program and does not affect the way program.
Java supports three types of comments: C + + style single line comments, C style some line, and special javadoc comment.
Comment writing C + + Style
C + + comment style begins with the / /. All text after / / is considered a comment. As an example,
// This is a C++ style or single line commentsComments are notes written in code with the goal as documentation. The text is not part of the program and does not affect the way program.
Java supports three types of comments: C + + style single line comments, C style some line, and special javadoc comment.
Comment writing C + + Style
C + + comment style begins with the / /. All text after / / is considered a comment. As an example,
Writing Style Comments C
Comments or C-style comments also referred to some lines begin with / * and ends with * /. All text that is between two marks are considered as comment. No comments such as C + + style, this comment can reach a few lines. As example,
/* this is an example of a
C style or multiline comments */
Special javadoc comment
Comments javadoc used for special men-generate HTML documentation for the your Java program. You can create a javadoc comment with the start line with / ** and mengakhirinya with * /. Comments such as C_style, can also reach a few lines. Comments can also consist of tags for add more information on your comment. For example,
/**
This is an example of special java doc comments used for \n
generating an html documentation. It uses tags like:
@author Florence Balagtas
@version 1.2
*/
The statement in the Java and Blocks
The statement is one or more lines of code that end with a semicolon. As for example is a single statement
System.out.println(“Hello world”);
Block is one or more statements between the brackets and the open brace brace brackets, namely a set of statements closed as one unit unity. Block statements can be collected but will not exactly have any relevance function. Some of the permitted amount of empty space there is inside, as an example of a block is:
public static void main( String[] args ){
System.out.println("Hello");
System.out.println("world");
}
Java Identifier
Java Identifier is a sign that represents the names of variables, method, class, etc.. Example of Identifier is: Hello, play, System, out. Pendeklarasian Java is case-sensitive. This means that Identifier: Hello is not the same as the hello. Identifier must begin with a letter, underscore "_", or dollar sign "$". Letters can be uppercase or lowercase. Characters
can further use the number 0 smpai 9. Identifier can not use the keyword in Java, such as class, public, void, etc.. Next we will discuss more about the keyword in Java.
Keyword in Java
Keyword is the identifier that has to be defined previously by Java for a particular purpose. You can not use keywords as variable names, class, your method, etc.. The following is a list of keywords in Java (Java Keywords).

We will discuss all about the meaning of each keyword and how they are used in the process of writing Java programs.
Note: true, false, null, and not including the keyword akan but they include special words, so you can not use them as variable names in your program.
Using NetBeans
Now we try to do our program with a more complicated way, let we see h
ow all the processes that have been described in the section previously using an application. In the lesson, we will be using NetBeans, which is the Integrated Development Environment or IDE. IDE is a scope programming that is integrated into a software application that provides a GUI builder, a text or code editor, a compiler or interpreter and a debugger.
Step 1: NetBeans There are two ways to run NetBeans. First write the command to use terminal, or simply by clicking on the shortcut button that can be found in desktop.To run NetBeans using the command-line. Open a terminal (see steps on how to run the terminal didiskusi before), and type:
netbeans.
 Second way to run NetBeans, is to click the shortcut icon there on your desktop.

Once you open the NetBeans IDE, you'll see a graphical user interface (GUI) as shown below.

Step 2: Create a Project
First, let's create a project. Click on File-> New Project. After do so, a dialog box will display the new project. Then click on Java Application and click NEXT.

Now, a new application dialog will be displayed.

Try to change the location of the application, by clicking on the BROWSE button. Then the dialog will show the location of project. Double click on your home folder.
 Then the contents of the root folder will be displayed. Then double click on the folder MYJAVAPROGRAMS and click OPEN.
 See Project Location and Project Folder has been changed to / home / florence / MYJAVAPROGRAMS. The latter, on the Create Main Class textfield, write Hello as the main class name, and then click Finish.

Step 3: Write in a Your program
Before you write a program, the first will be described on the main window after creating project. As shown below, automatically create NetBeans code base for your Java program. You can add statements in your code that has been generate. On the left side of the window, you can view a list of folders and filefile NetBeans generated after creating a project. All this you can
MYJAVAPROGRAMS find in your folder, where you specify the location of project it.

Now, try to modify the code generated by NetBeans. At this time ignore other parts of the program, details of the code will be described in the next section. Enter code:
System.out.println ( "Hello world!");
After the statement, / / TODO code application logic here.
Step 4: Compile your program
Now, to compile your program, click on the Build-> Buid Main Project. Or, you can also use the shortcut button to compile your code.
If there is no error in the program, you can see a build successful message in the resulting window.

Step 5: Running Your Program
To run your program, click on Run-> Run Main Project. Or you may also can use the shortcut to run your program.
Results from your program displayed in the window.

ow all the processes that have been described in the section previously using an application. In the lesson, we will be using NetBeans, which is the Integrated Development Environment or IDE. IDE is a scope programming that is integrated into a software application that provides a GUI builder, a text or code editor, a compiler or interpreter and a debugger.
Step 1: NetBeans There are two ways to run NetBeans. First write the command to use terminal, or simply by clicking on the shortcut button that can be found in desktop.To run NetBeans using the command-line. Open a terminal (see steps on how to run the terminal didiskusi before), and type:
netbeans.
 Second way to run NetBeans, is to click the shortcut icon there on your desktop.
Once you open the NetBeans IDE, you'll see a graphical user interface (GUI) as shown below.

Step 2: Create a Project
First, let's create a project. Click on File-> New Project. After do so, a dialog box will display the new project. Then click on Java Application and click NEXT.

Now, a new application dialog will be displayed.

Try to change the location of the application, by clicking on the BROWSE button. Then the dialog will show the location of project. Double click on your home folder.
 Then the contents of the root folder will be displayed. Then double click on the folder MYJAVAPROGRAMS and click OPEN.
 See Project Location and Project Folder has been changed to / home / florence / MYJAVAPROGRAMS. The latter, on the Create Main Class textfield, write Hello as the main class name, and then click Finish.
Step 3: Write in a Your program
Before you write a program, the first will be described on the main window after creating project. As shown below, automatically create NetBeans code base for your Java program. You can add statements in your code that has been generate. On the left side of the window, you can view a list of folders and filefile NetBeans generated after creating a project. All this you can
MYJAVAPROGRAMS find in your folder, where you specify the location of project it.

Now, try to modify the code generated by NetBeans. At this time ignore other parts of the program, details of the code will be described in the next section. Enter code:
System.out.println ( "Hello world!");
After the statement, / / TODO code application logic here.
Step 4: Compile your program
Now, to compile your program, click on the Build-> Buid Main Project. Or, you can also use the shortcut button to compile your code.
If there is no error in the program, you can see a build successful message in the resulting window.

Step 5: Running Your Program
To run your program, click on Run-> Run Main Project. Or you may also can use the shortcut to run your program.
Results from your program displayed in the window.

Errors
What has been indicated so far is a Java program where we did not find various problems in the process of compiling and running it at the time. However, this does not always happen. As we discussed in the The first part of this exercise, we will also usually find the problems
during the process.
As discussed previously, there are 2 kinds of error. First is compile-time error, or also called as a syntax error. Second is the runtime errors.
Syntax Errors
Syntax errors usually occur because of errors. You may lack a command in Java or forget to write the dot-coma at the end of the statement. Java attempts to isolate the error shows how
lines of code and the first one refers to the characters in the bar.
However, error will not necessarily be at the designated point. Other common error is in the capitalization, spelling, the use of characters special that is not correct, and omission of the punctuation actually.
Let us take an example, the program Hello.java, where we deliberately the point-comma at the end of the statement and also try to type in spelling is wrong on an order.

See error message that is displayed after the Peng-compile-run a program. The first error message that tells you there is a program in error in line 6. This is the word refer to the after statict, which should be spelled as static.
The second error message that tells the program to lose titikkoma after your statement.

If you find an error message, try to edit a mistake The first error in the list one by one, and try to mengkompilasinya you are welcome. By doing so then, can reduce the total error.
Run-time Errors
Run-time error is an error which will not be displayed until you run your program. Even programs that compile successfully may display the wrong answers if the programmer has not thought through the logical structure and from the program.
Saturday, June 13, 2009
You recognize the scope Programming
IDE is a programming equipment in the integrated into the application software that supports the development of GUI, text or writing code, the compiler and debugger. This tutorial uses Ubuntu Dapper as the operating system. Before use this tutorial, make sure that have installed Java and NetBeans in system you use. For instructions on how to install Java and NetBeans, can be seen in Appendix A. For versions of Windows XP in this section, can be seen in Appendix B.
Before discussing more detailed, at first we will see the first Java program that you will write.
First Java Program
public class Hello
{
/**
* My first java program
*/
public static void main(String[] args) {
//Display the words "Hello world"
System.out.println("Hello world!");
}
}
Before explaining what the meaning of the program, try to write a program in a file and then run it.

Step 3: Write a Java program listing in your text editor.

Step 4: Keep your Java program This program will be stored in a file called''Hello.java'', and stored in a folder named MYJAVAPROGRAMS. To open the Save dialog box, click on the File menu in the menubar and
then click save. After installation, the dialog box will appear like the picture below it.
Picture

Click on the browse button, then click Create Folder.


Name the new folder, MYJAVAPROGRAMS. Now, click on the folder MYJAVAPROGRAMS to know the contents of the folder that is inside. After you click on the folder, you'll see a picture like that shown below. At this time folder should be empty until a new folder terbuatnya and we will save everything inside the folder.

Now, in the textbox Selection, type the file name of your program, that is Hello.java'''', then click on the SAVE button.

Now you've saved your file, remember how the name of the frame can changed from''Untitled Document 1 (modified) - gedit''to "Hello.java (~ / MYJAVAPROGRAMS) - gedit. "If you want to make changes to your file, You only need to edit, and save them again by clicking the on File-> Save.

Step 5: Compile your program The following is a program you compile. Go to the Terminal Window that we have been open before. When you open a terminal window, the terminal window that displays referred to as your home folder. To view the contents of the folder, type ls and then press ENTER. What you will find is a list of files and folders in it.
You can see is the folder with the name "MYJAVAPROGRAMS" we have created earlier, and is a place where we save the program Hello.java us. Then go to the directory. To enter into a directory, type the command: cd [directory name]. Cd''command''is used to change the directory. In this case, the name of the directory we MYJAVAPROGRAM is, then you must type: cd MYJAVAPROGRAMS.

Once inside the folder that contains your Java program, it is time to begin to compile the Java program. As a note, that the file you meaning there must be inside the folder you select. Check with the ls''command''to see that you have in the file folder.

To compile the Java program, use the command: javac [filename]. Deep this case, you mengetikan command: javac Hello.Java.

During Compilations, javac add the file to disk in the so-called [filename]. class, or in this case, Hello.class, which is the actual code.
Step 6: Menjalakan Program During the Compilations process, javac add new files into the disk which is called [filename]. class, in this case, Hello.class, which is the actual time code This, with the estimates do not have problems with the compile time process (we will investigate and discuss the problems found during the compile process, the the next section), is a ready to run your program.
To run your Java program, by typing the command: java [filename without the extension], then in this case, you type the command: java Hello. Now you can see on the screen that you have to run a Java program You first, which displays the message,''Hello world!''.

Also Read:
Before discussing more detailed, at first we will see the first Java program that you will write.
First Java Program
public class Hello
{
/**
* My first java program
*/
public static void main(String[] args) {
//Display the words "Hello world"
System.out.println("Hello world!");
}
}
Before explaining what the meaning of the program, try to write a program in a file and then run it.
Using the Text Editor and Console
In this example, we will use a text editor to edit Java programs. You will also open a terminal window to compile and execute your Java program.
Step 1: Starting Text Editor To start the text editor in Linux, click on Applications-> Accessories-> Text Editor.

Step 2: Open the Terminal To open a terminal in Linux, click on Applications-> Accessories-> Terminal.

Step 3: Write a Java program listing in your text editor.

Step 4: Keep your Java program This program will be stored in a file called''Hello.java'', and stored in a folder named MYJAVAPROGRAMS. To open the Save dialog box, click on the File menu in the menubar and
then click save. After installation, the dialog box will appear like the picture below it.
Picture

Click on the browse button, then click Create Folder.


Name the new folder, MYJAVAPROGRAMS. Now, click on the folder MYJAVAPROGRAMS to know the contents of the folder that is inside. After you click on the folder, you'll see a picture like that shown below. At this time folder should be empty until a new folder terbuatnya and we will save everything inside the folder.

Now, in the textbox Selection, type the file name of your program, that is Hello.java'''', then click on the SAVE button.

Now you've saved your file, remember how the name of the frame can changed from''Untitled Document 1 (modified) - gedit''to "Hello.java (~ / MYJAVAPROGRAMS) - gedit. "If you want to make changes to your file, You only need to edit, and save them again by clicking the on File-> Save.

Step 5: Compile your program The following is a program you compile. Go to the Terminal Window that we have been open before. When you open a terminal window, the terminal window that displays referred to as your home folder. To view the contents of the folder, type ls and then press ENTER. What you will find is a list of files and folders in it.
You can see is the folder with the name "MYJAVAPROGRAMS" we have created earlier, and is a place where we save the program Hello.java us. Then go to the directory. To enter into a directory, type the command: cd [directory name]. Cd''command''is used to change the directory. In this case, the name of the directory we MYJAVAPROGRAM is, then you must type: cd MYJAVAPROGRAMS.

Once inside the folder that contains your Java program, it is time to begin to compile the Java program. As a note, that the file you meaning there must be inside the folder you select. Check with the ls''command''to see that you have in the file folder.

To compile the Java program, use the command: javac [filename]. Deep this case, you mengetikan command: javac Hello.Java.

During Compilations, javac add the file to disk in the so-called [filename]. class, or in this case, Hello.class, which is the actual code.
Step 6: Menjalakan Program During the Compilations process, javac add new files into the disk which is called [filename]. class, in this case, Hello.class, which is the actual time code This, with the estimates do not have problems with the compile time process (we will investigate and discuss the problems found during the compile process, the the next section), is a ready to run your program.
To run your Java program, by typing the command: java [filename without the extension], then in this case, you type the command: java Hello. Now you can see on the screen that you have to run a Java program You first, which displays the message,''Hello world!''.

Also Read:
Subscribe to:
Posts (Atom)

